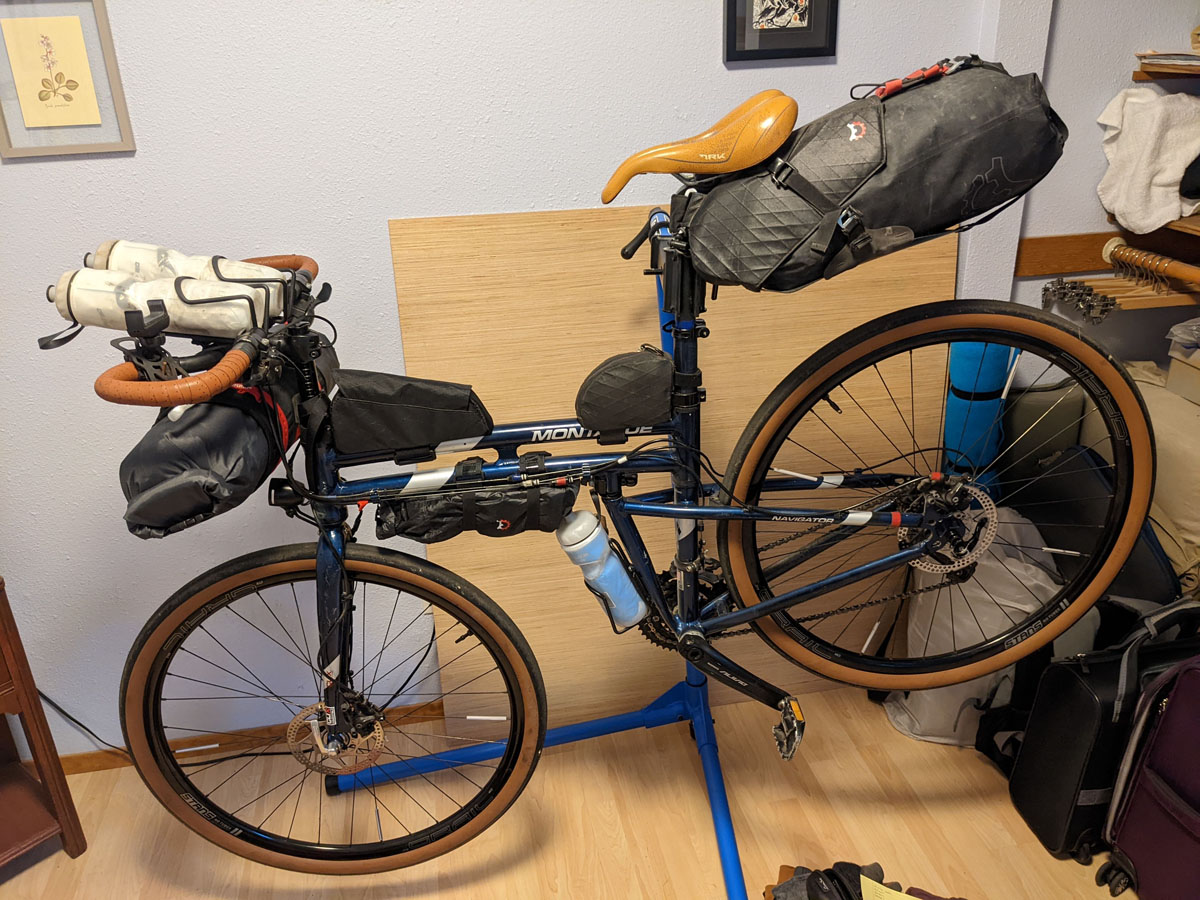
Today’s guest post comes from James Sowerwine, an avid traveler and bikepacker who takes his Montague Navigator folding bike and custom bikepacking setup with him everywhere he goes. He has a unique way of packing his bike and gear for airline travel and has kindly agreed to share it with us and the Montague community.
NOTE: The following packing instructions involve more disassembly than the standard folding procedure for a Montague bike. Only attempt if you are confident in your mechanical abilities. If you do attempt this process, take note of the order of all parts to make reassembly possible. If you have any questions about your bike, please bring it to a professional bike mechanic.
Part 1: How to fit a Montague Navigator in a single standard suitcase
A stock Montague Navigator bicycle can be used as a reliable touring bike that fits into a 62 linear inch (LxWxH) suitcase with a few modifications. This allows bike and rider to fly for the base cost of a plane ticket as most airlines include a single checked bag up to 50 pounds (23 kg) and 62 inches (158 cm) free of charge. How to do this with a stock model:
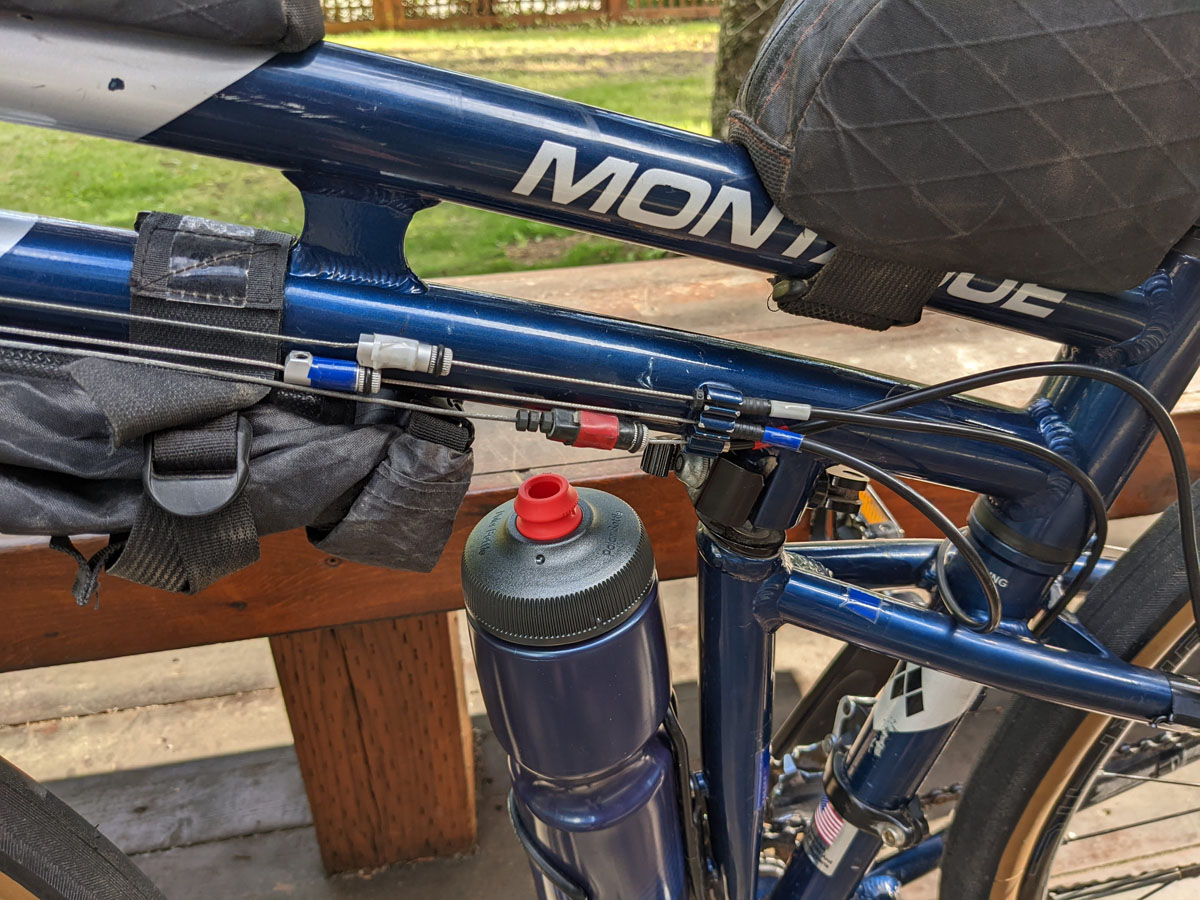
1. Add quick disconnects to both shifter cables and the rear brake cable. I used Ritchey brand Bab cable disconnectors (https://ritcheylogic.com/bike/accessories/bab-cables-disconnectors). This allows all three cables to be temporarily split at a point on the top tube when packing the bike for travel. Cable tension is restored when the disconnects are recoupled, generally without need for re-tuning of shifters or brakes. Note that you will need a second set of brake and shifter cables to install the disconnects. I have also added colored-coded electrical tape to the cables to enable faster reassembly as it is easy to confuse which ends go together. If you do the installation work yourself your total cost for adding the disconnects will be around $50,
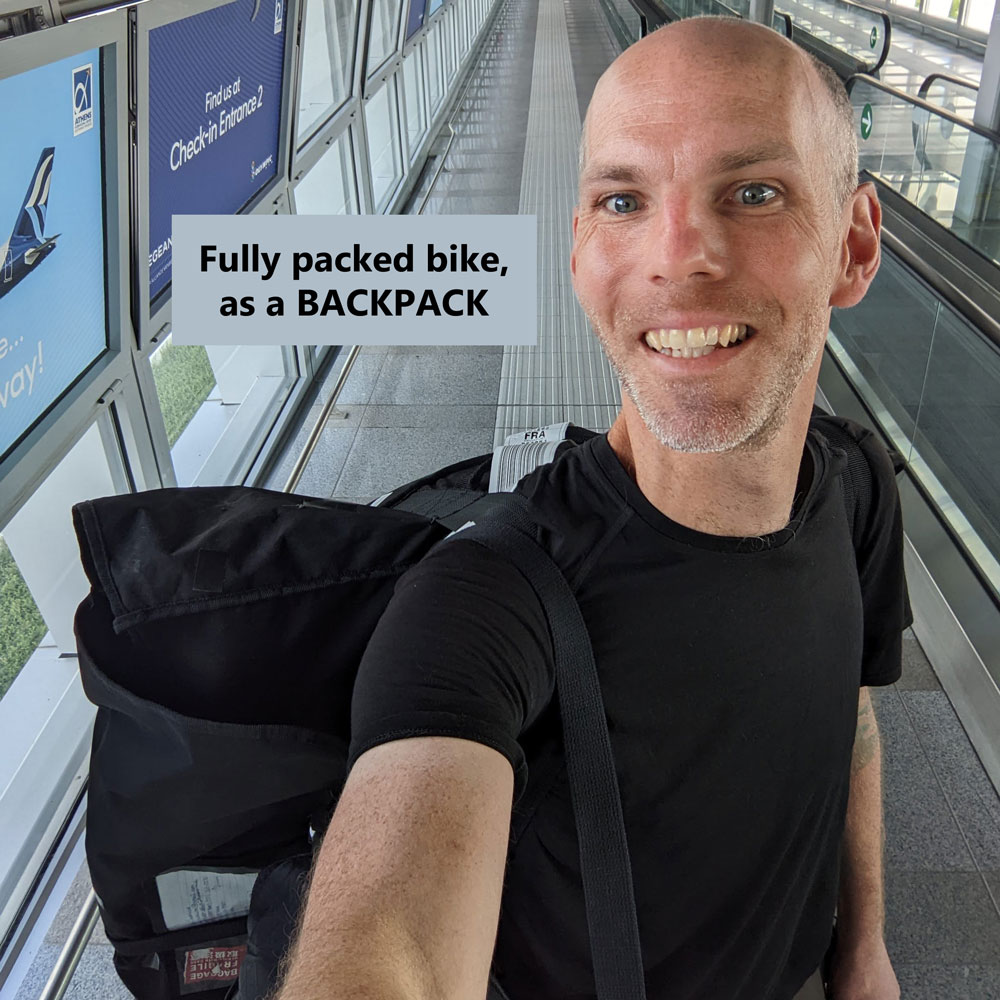
2. Purchase an extra-large nylon pizza delivery bag that is at least 28 inches square by four or more inches high. The bags I purchased several years ago do not appear to be available but see the “Big Daddy Pizza Jacket” on deliverybags.com for a similar product. Most of these larger pizza delivery bags have a set of hand-held carrying straps that double as over-the-shoulder straps if the bag is used as a backpack. Look for bags that are advertised to fit at least two 28” pizza boxes as two 700c wheels and a frame are roughly the same size and shape. Note that you may need to reinforce the stitching where the straps are sewn onto the bag with upholstery thread, and it may be helpful to remove the padding from the bag to reduce the bag’s volume if you choose to roll the bag up and store on your bike when touring. Your total cost may vary here but will likely be around $65.
3. You are now ready to pack the bike. To fit the bike into the bag (in no particular order):
a. Remove the pedals, seat post, front wheel and any bottle cages.
b. Uncouple the cable disconnects. Then separate the front portion of the frame from the back by releasing the quick release lever that allows the Navigator to fold and then loosen the two bolts on the clamps on the seat tube that are located above the quick release. The front frame assembly can then be slid/lifted off the back assembly. A bit of grease on the seat tube helps here.
c. Remove the stem from the fork so that the bars can be turned fully sideways for packing. Remove the disc brake rotors to guard against bending in transit, the brake mechanisms, and the rear derailleur so that they can be placed safely around other parts. Do not disconnect the cables from the brakes or rear derailleur assemblies.
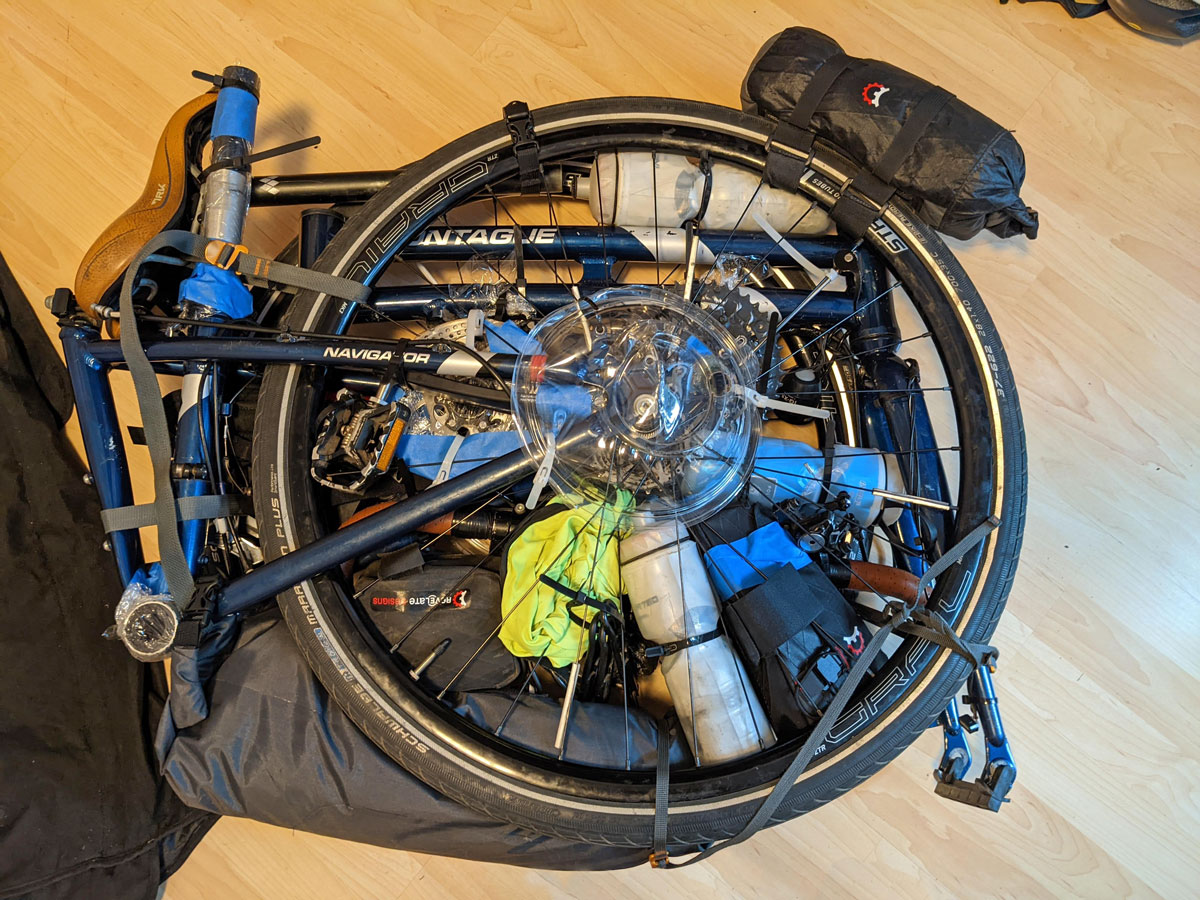
d. Stack the front frame assembly and handlebar on top of the rear wheel. Then complete the sandwich by placing the front wheel on top of the front frame assembly. The center point of the two wheels should be slightly offset from each other.
e. Compress the wheels together using four straps placed at 90 degree intervals. I use 40” Sea to Summit hook release accessory straps because they are light weight, durable and have a simple design.
f. Secure remaining parts inside the wheel sandwich with zip ties. I use ties that have an additional plastic tab on the tie mechanism that allows the tie to be released and reused when repacking for my flight home.
g. Protect vulnerable points that may stick out of the sandwich including the stem riser, rear wheel quick release, and top of the seat tube by zip tying on small single-use plastic cups or other similar plastic clamshell type containers. Bikepacking bags stuffed with lightweight clothing can be added to further support the frame and wheels. Clean salad containers also work well to provide support in empty spaces in the bag. Note that the biggest risk of damage comes from exposed parts of the frame being dragged along floors by baggage handlers – these are the points I protect with a plastic cup or salad container lid.
h. Place a brace where the wheel would sit in the front fork. Your local bike shop should have lightweight friction-fit plastic braces available as they ship out with new bikes and are generally thrown away after initial bike assembly. Such braces can be reused indefinitely even though they are intended for single use.
i. Slide the dissembled bike into the pizza bag. I close the bag with a set of D ring belts that allow security staff to open the bag and inspect the contents.
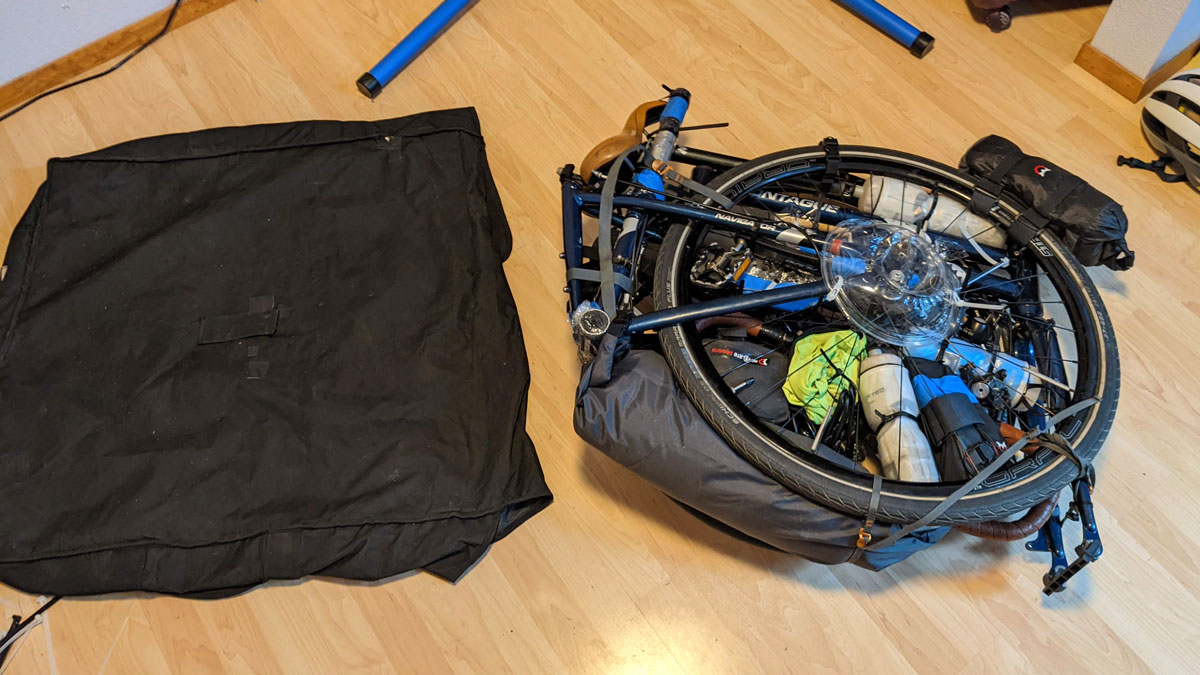
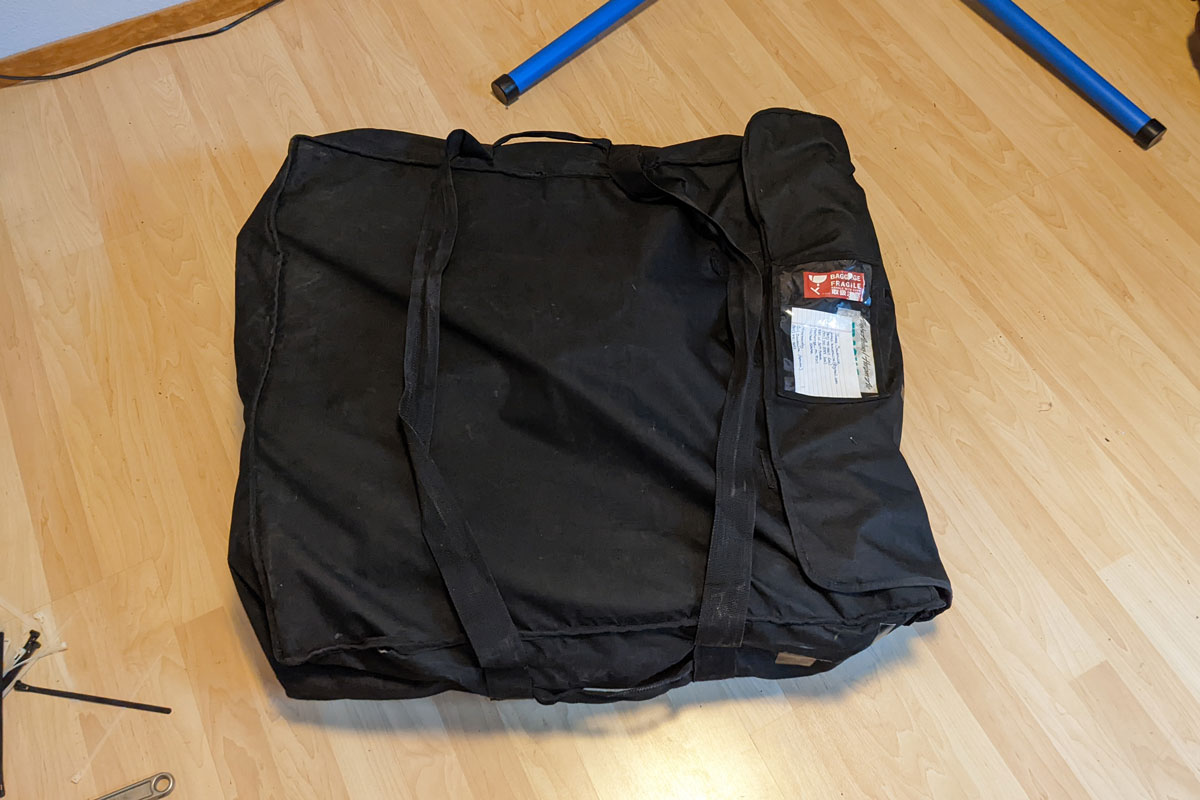
4. You are ready to fly. The bike will need to be delivered to TSA’s oversized bag check counter due to its width but will not be charged oversized luggage fees by the airline. Note also that the size of the bike in the bag matters to the airline rather than the bag itself, so the bag can be a bit larger than 62” LxWxH as long as the packed dimensions are at or even slightly over the size limit.
5. Finally, note that disassembly and reassembly both take around two hours, and that the bike frame is susceptible to cosmetic damage in transit when packed as described above. I only fly a bike this way when traveling on international flights.
About the Bike
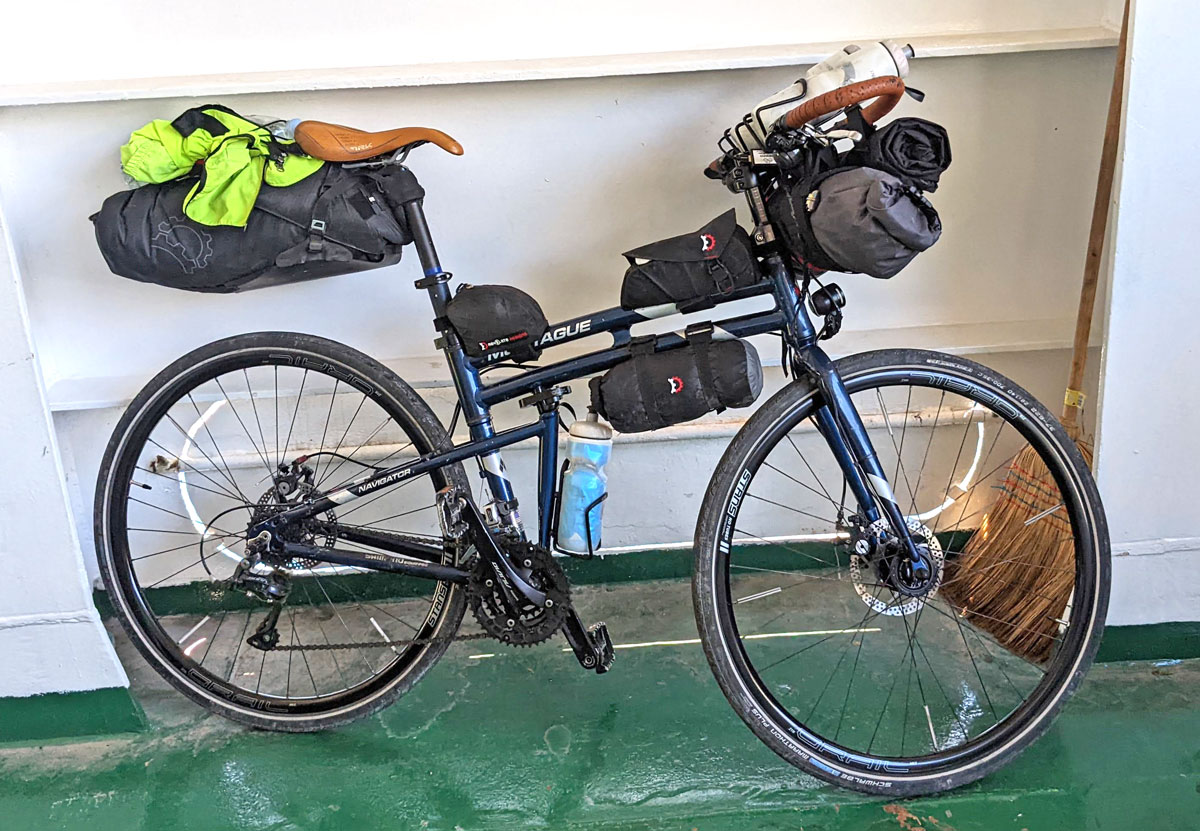
Additional modifications to my Navigator and associated travel kit to facilitate touring:
- I replaced the saddle with a Selle model that provides an additional riding position on its pronounced dipped nose. This is a matter of personal preference though.
- I replaced the stock pedals with a Shimano model that is clipless on one side, flat on the other. As with the saddle this is a matter of preference.
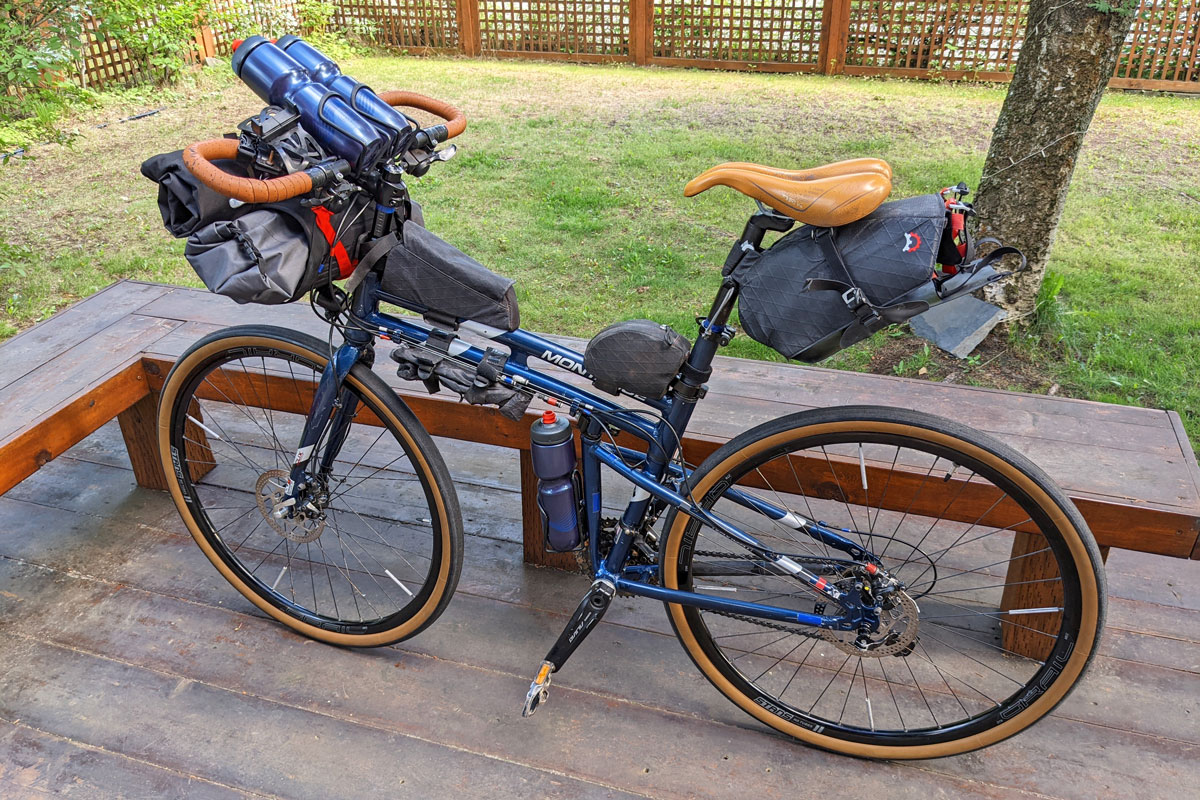
- While the Navigator comes with a rear rack, I generally elect to travel with the stock rack removed, and instead use Revelate bikepacking bags that provide a more streamlined profile. I currently use a fourteen liter seatpost bag that contains my clothes and toiletries and a handlebar harness system that contains a tent, 30° sleeping bag and pad. I also have two cockpit bags for repair items and snacks, and a downtube bag that holds jackets. The seatpost bag and downtube bag double as fenders. The bag that the bike flies in is stored on the handlebars together with the sleeping kit.
- I have replaced the stock wheels with a set that allow for use of Rene Herse tubeless tires.
- I also added a dynamo hub when the front tire was rebuilt. The hub provides power for a headlight and USB charger that is mounted on my handlebars that allows me to keep my phone and other electric devices charged.
- I have replaced the headset assembly as the exterior bolts on the stock Navigator are prone to stripping out when under weighted load, such as from handlebar bags. Note that the headset bolts are the only part of the stock bike that is not robust enough to tour on.
- I have also replaced the stock flat bar with a trekking handlebar. This change provides multiple different hand positions for touring without requiring a change of the stock shifters.
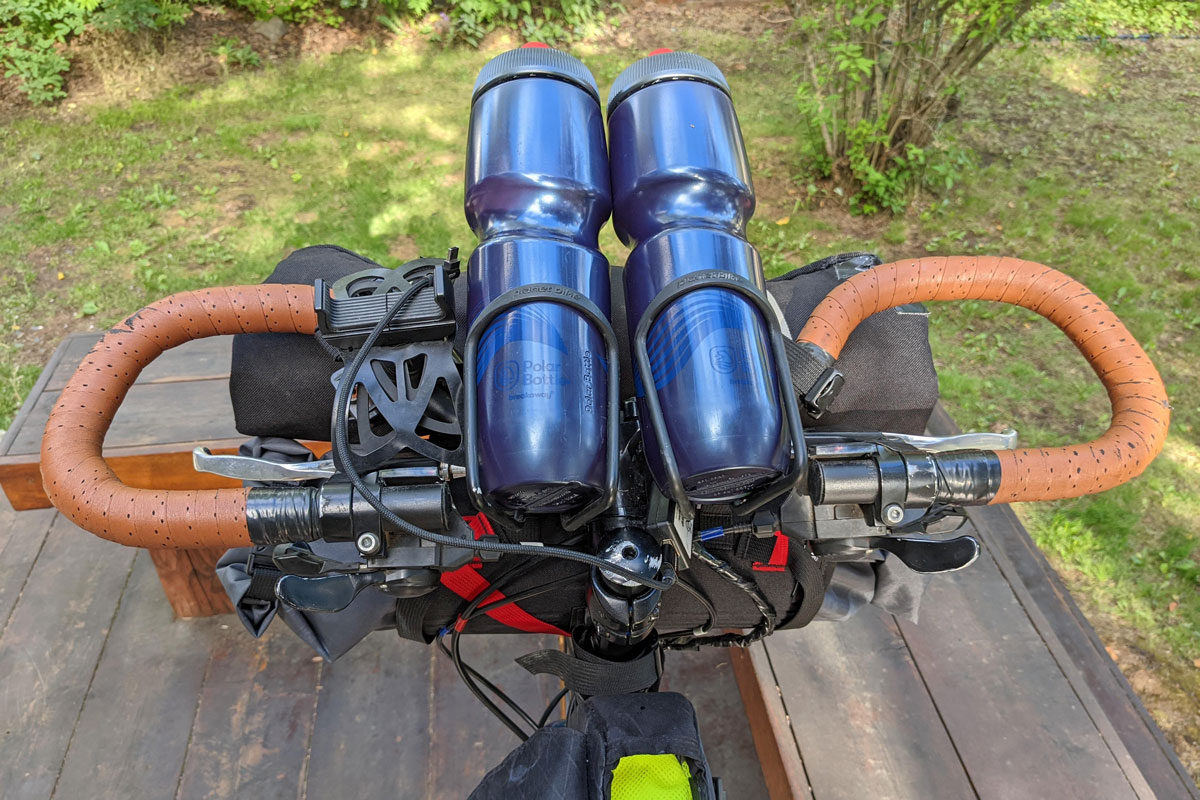
- I replaced the front cassette with an alternative that can more readily be removed for travel. The pedal arms can also be unbolted from this cassette.
- I have added two bottle cages on the handlebars as the frame has a single bottle mount.
- I carry a several USB-rechargeable AA and AAA batteries. These in turn power all of my electric devices (razor, headlamp, rear bike light), and can be recharged from the dynamo hub.
- I carry a lightweight sleeping bag (made by Zpacks out of Florida), a bivy bag (Outdoor Research Helium) or tent (Six Moons Lunar Solo) and pad (Thermarest Xlite, size small). The bag, bivy & pad combo weighs under three pounds and provide me shelter for those few nights each trip I end up outdoors, and the security of knowing that I have warm and dry cover if I’m caught in unexpected bad weather.
- My repair kit includes: A Lezyne pump, Crankbrothers bike multitool, small general purpose multitool, spoke wrench, 2 oz of chain lubricant, 1/2 oz of blue grease, tire sealant, tire patch materials, tire levers, cogset removal tool, disc brake removal tool, spare shifter and brake cables, two spare spokes, spare chain link, tire patches, a copy of my passport, a second set of credit cards, backup bike lock key and water purification tablets.
- I secure my bike with a lightweight titanium lock made by Altor. It may be unnecessary but it is reassuring to know the lock will require significant effort to cut when I am dashing inside a store or the frame is outside overnight. We pack our insecurities.
Weight: The bike, bikepacking bags, sleeping kit, repair kit, lock and travel bag weigh around 40 pounds (18 kg) when checked. I generally use the seat post bag as a carry on. It weighs around 7 pounds, though this is more reflective of my choices for clothing and toiletries and could be reduced. Most of my clothing is smartwool or similar fabric.
Cost: I paid about $950 for a stock Navigator. Upgrades (cable disconnects, handlebars, headset, dynamo system, wheels and tires, front cog set, saddle, pedals) have cost around $2500 with labor (Many thanks here to Nicholas Carmen and the rest of the folks at The Bicycle Shop in Anchorage, Alaska). Bags were around $600, for a total cost of around $5000. The sleeping kit cost an additional $1000. While the project fails a straight dollar to dollar economic analysis (around $2000 in luggage fees saved to date vs. $5000 for the bike), the ease of knowing I can show up with a single bag and fly without question, and the ability to carry the bike in a backpack justifies the extra cost for me. I also find the bike to be incredibly comfortable to ride, with no back pain issues to date. It’s a specialty concept, but for those folks who are interested to take the time to follow a similar path, and who are willing to risk a bit of cosmetic frame damage while in transit, it’s a lovely way to ensure that your bike is with you wherever you go.
Overall: Monatgue’s Navigator frame fits the role of travel touring bike well for several reasons. It’s remarkably comfortable, as the riding position is nearly vertical and the cockpit space is extremely slack. It comes with a rear rack for any trips that require the rider carries several days meals. The frame is light enough that it remains practical to carry the bike in a backpack, yet is durable enough that it survives traveling in checked luggage in a lightweight bag. The bike can be used on dirt and gravel trail surfaces. Its best attribute is that it goes with me as a standard checked suitcase, which means I don’t have to worry about excess baggage costs, and perhaps more to the point, it transfers easily when I fly a codeshare itinerary with both major and regional air carriers that might otherwise reject a larger box. It also folds as originally intended by Montague, so I don’t have trouble securing a spot when taking a bus, train, subway or pedestrian ferry that might otherwise reject a bicycle. It is an unusual but wonderfully well fit tool for seeing the world at eight miles an hour.
I am happy to answer how-to questions. Please contact me at james.sowerwine [at] gmail.com
Part 2: But why fit a Montague Navigator into a suitcase? (It’s not for everyone but may be for you)
I have been eager to write up how-to notes for flying a Navigator for several years now, but have been equally uneasy about writing about the solo international touring that I use the Navigator for. My hesitancy comes from a desire to be humble in my online communication the Instagram and Twitter age, as there are many people in the world who have traveled more or ridden both farther and faster than I ever hope to, and uncertainty about how best to tell my own motivation for visiting other places. However, it’s impractical to describe how to build a specialty bike without explaining at least a little about why you built a specialty bike; the two topics are inextricably linked. I very much want to share my own personal why as well as the how in the hope that others will think to themselves ‘Oh, I have wanted to do that and know I think I can do that’ and possibly ‘Oh, I had never thought about that but know I think I want to do that”. An explanation of my motivation for this project follows, as well as a few observations about trip planning.
Personal motivation: I was drawn to multi-day running before I turned to cycling. My wife and I watched a documentary about week-long ultra races, which led me to think that I could do the same, and then to explore the very small world that exists between fastpack hiking and multi-day running. I found that niche to be tremendously rewarding but also impractically difficult. So I took the weight reduction theories of distance running and turned to cycle touring, which dovetailed well with a longstanding desire to visit other cultures. I am also lucky to live in a small place that has an unusually big community of people who create and race new bikepacking routes. While my intuitions for travel trend slightly more towards pavement than the bikepacking folks tend to look for, knowing that friends of friends have already cycled through nearly every country in the world has done a lot to settle any jitters I may have had going into this project. With that in mind I rebuilt the Montague Navigator frame described above with the intention of being able to regularly visit out-of-the way corners of other countries during my time off from work without having to fly a full-sized touring or gravel bike.
I’ve completed a handful of solo trips to date, generally about three weeks each in length. My first was northern Canada, then Scotland-England-Ireland-Wales, followed by Japan. Covid limited options for travel but I recently returned from Greece-Macedonia-Kosovo-Albania-Croatia-Slovania-Italy, with the Pacific Coast in between when international flights were unavailable. A reader will correctly deduce that I am selecting routes that add complexity with each successive trip. I hope to visit South Korea next, and may trace the former Iron Curtain through the Baltics after. I generally build trips around airport access – I select a pair of airports that are relatively easy to fly into and out of and that are separated by 800 to 1200 miles. Once I have selected beginning and end points I do high level planning for a route between, generally with a week or so on the bike, then one or two rest days, followed by another week by bicycle, and a few extra days at the end of the route for insurance and relaxation prior to returning home. I also book a hotel for my first and last evenings to ensure that I don’t have to scramble to find lodging with easy transport to and from the airport. My route between airports often changes dramatically as I learn more about the region I am visiting. The distance I travel per day varies but is generally between 65 to 85 miles (105 to 135 km)
Why do this? I find solo international travel by bicycle to be uniquely challenging in a completely positive way. Travel places me in settings where I don’t know the social standing of the people around me, temporarily steals my ability to communicate in my native language and necessitates that I rely on other’s goodwill, all of which in turn requires me to emphasize the less guarded parts of my own personality in order to navigate in a foreign place. This runs counter to most the social intuitions we develop as adults. The benefit is the potential to form marvelous connections with others. While a friendly and cheerful demeanor, openness and patience are the things you need to successfully book a hotel room, they can also turn a minor interaction like buying snacks at a convenience store into an hours-long discussion. I have found that one is rarely to never lonely when solo traveling because there are so many opportunities to talk with people when you stand out and endeavor to be open to impromptu conversations. While I enjoy the ability to ride a bike for several weeks on end and also travel to explore the interaction between economy, culture and development, this than anything else has become the primary driver for my travel.
Additional trip planning notes: I generally use Google Maps to follow paved side roads with low traffic volumes, but also use gravel, dirt and cobble surface trails (when in doubt you can double check traffic volumes with Streetview and elevation profiles with the pedestrian route search feature). Google translate provides translation services when needed. Google maps also provides information on food and lodging. My cell phone service is through Google Fi, which offers US data rates with global coverage, for a total cost of around $15 per week for data while traveling. Fi is extremely reliable.
I plan for around two and half to three weeks per trip. Flights, ground travel from the airport and bike assembly use around four days, and I try to reserve three more for contingencies and zero-mile rest days, which leaves two weeks for true on-the ground exploration. To save time and limit stress I do not attempt to pedal through cities that are over a half million people in size. Trains, buses and subways all provide quick links through or around larger metropolitan centers, which can otherwise take up to two days to cross when populations exceed several million. Big cities also provide excellent opportunities for rest days. I occasionally use trains or ferries make up mileage or to jump to entirely different parts of a region.
Food and drink are a major focus when I travel. While I often restrict my research about a region to its history and politics prior to visiting with the intent of limiting my preconceptions, I make an exception for food, with the goal that every day will be a search for some new item or meal that the region or country may be known for. Meals take on a whole new angle when they double as treasure hunts.
Overall: The takeaway I intend here is that international travel by bike, while not for everyone, has a surprisingly low threshold for entry if you have interest in trying it. There is certainly some work involved, and not all moments are pleasant, but it’s a marvelous way to broaden your horizons. A wealth of tools has collected in the last twenty years (smartphones and international data plans in particular) that makes this sort of travel readily accessible to anyone with two weeks and an airline ticket.
If you find this writeup useful, please email me at james.sowerwine [at] gmail.com, as I would love to know that this was helpful to others.


Inspiring! I also own a Navigator, as well as a collection of new and old Montagues I bought over the years. I bring my wife and one of two adult children on our bike trips. On one tour we packed all our Montague bikes in the soft Montague bags, padded with cardboard and bubble wrap. On the last trip, we actually repurposed the boxes we bought them in for the plane and then used the soft bags for trains and buses. We put a lot of miles on them and unforgettable trips.
brilliant! thansks so much – exactly what ive been trying to work out how to do!
Can the front handlebars be removed as part of a general fold…?
John, the only thing that changes on a general (quick) fold is that the quick release on the down tube is released. That allows the top tube(s) and headset/handlebars/front wheel to be folded on top of the back wheel. The handlebars are pivoted 90 degrees and laid flat and in-line with the frame. The whole package on a quick fold is far too bulky for airline travel but does allow you to stuff the bike into the luggage compartment of a minibus with the flick of a quick release, or into a bag for travel on a train or subway.
Everything comes apart for packing for airline travel.
Exciting.
Why?
I just today bought a secondhand Montague Navigator. 2015 model so it doesn’t have disk brakes but I don’t care. Some excellent ideas here which I shall study in depth. So (after modifications of the bike) a specially whopper pizza bag should solve the bag issue? Excellent: I’ve just been starting to look at bag solutions (for public transport here in the UK). I had already started to ask searching questions like: shouldn’t it be dual-use, i.e. carry the bike … but also function as a backpack …